To download: Scroll right down to bottom and click on arrow next to "Dolls tips pdf."
FIGURES FOR PLAY THERAPY AND FOR CHILDREN WITH VISION IMPAIRMENT
Ernie Newman
Many of these figures are designed specifically for use in play therapy and for children with vision impairment but have general appeal. Some are designed for adult play therapy and are not suitable for children, for example the bird with beak scissors. I hope that woodworkers will be inspired to make similar figures and donate them to play therapists, teachers of children with disabilities and early childhood teachers. I offer technical construction tips below.
“Children’s games are hardly games. Children are never more serious than when they play.” Michel de Montaigne 1533-92
Many practitioners rely on standard toys for play therapy. This can work well but there is another option. For fifteen years I made dolls for preschools and child therapists, all smooth and pretty, but one question changed everything. "Can you make some dolls for kids who are blind?' Touch, smell and sound - of course! I realized that magnets would enable mothers and babes to cling to each other and textured surfaces could intrigue and delight.
Carved, burned, sand blasted and weathered surfaces can arouse curiosity and reward touch. Some dolls feature cold metal, warm cloth, aromas and painting. They can rock when touched, whistle, rattle and some “cry”. Some reveal divided selves. They can carry a removable burden or cast it off. Some can fly when wings are attached. And there are birds and beasts.
Children in therapy and those with vision impairment have taken to these dolls. It is poignant that a number of kids identify with those that appear damaged.
The dolls shown on this site are not available commercially and if they were, most would be very expensive. However, therapists and teachers may be able to acquire several similar dolls at no cost. Recreational woodturning, woodcarving and woodworking clubs often donate wooden dolls, cars and other toys to charities. If therapists and teachers request dolls like these, they are more likely to get a “yes” if they cover these points:
1/ explain that you can’t buy them
2/ ask for interpretations rather than exact replicas
3/ provide this article and the tips below as a guide
4/ ask for some plain, unvarnished dolls for others to embellish – painters, pyrographers, woodcarvers, quilters…
Therapists and teachers could try local clubs or the American Association of Woodturners which has over 360 chapters worldwide. https://www.woodturner.org/Woodturner/Chapters/Find-a-/Woodturner/Landing-Pages/Chapter-Find-a-Landing-Page.aspx
THERAPY DOLLS – DESIGN AND CONSTRUCTION TIPS
What a privilege to make toys that give children pleasure. But toys can do more than that. Play therapists such as psychologists, psychiatrists and social workers, observe troubled children expressing themselves through play and help them explore emotions and deal with unresolved trauma. Toys that appeal to children’s love of texture, color and playful ideas are gold for therapists.
The dolls shown at https://ernienewman.weebly.com/, as well as the following guidelines, are meant to inspire design ideas, but therapists and teachers may have suggestions that could lead to improvements. Even if you are an inexperienced woodworker, you can make delightful dolls by collaborating with other woodworkers and craftspeople. Woodcarvers, pyrographers, painters, and quilters could add texture, color, fabric, or other embellishments.
Safety
Some figures shown here are not suitable for children, for example, the bird with beak scissors. Others such as the hammer head doll require supervision.
Ensure that metal components, especially rare earth magnets, are absolutely secure and cannot be removed. Choose child friendly finishes. Imagine what a curious, clever child might do so make each doll as and strong safe as possible.
Some countries insist that toy components be too large to swallow for children under four. Check your national safety standards.
Shapes and surfaces
Dolls with simple shapes allow kids maximum freedom to fantasize. Many therapists [and preschool teachers] prefer dolls without facial detail. This way the child can make the dolls represent whoever they want.
Texture
Texture can be created with powered burrs, hand carving, burning, wire brushing, pyrography, sand-blasting, stippling, chatter-work… Weathered wood and natural edges also provide stimulating contrasts to smooth surfaces.
Natural edges may be disturbing because they suggest that a doll is broken or damaged, but some kids identify with these dolls.
Temperature
Cold metal contrasts with the warmth of wood and cloth.
Smell
A doll can be hollowed to hold perfume or aromatic oils and can be sealed with a glued wooden plug. The plug could be re-bored and replaced to allow a refill.
Sound
Tiny ball bearings or grains of rice inside a doll make a satisfying rattle. Bore and secure with a glued wooden plug. Clickers salvaged from cheap toys can also be inserted. A doll may be a whistle.
A Japanese Kokeshi doll [see the last image] “cries” for its mother when its head is twisted. The head could eventually come loose so they are probably not suitable for a preschool but they are a gratifying gift for a careful child. Detailed tips and a drawing are provided at the end of this article.
Movement
If the base is an inverted dome then the doll can rock.
Size and Weight
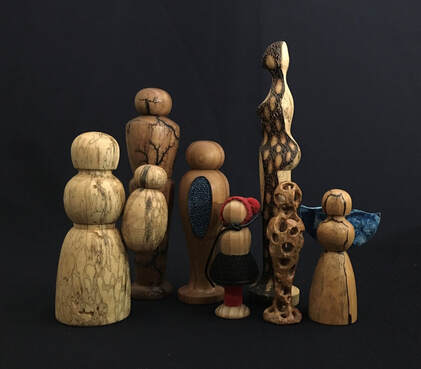
The dolls pictured here range from 60 mm to 300 mm high. Some are light, some heavy. A metal weight can be glued in the base to add stability. If the weight is hidden it may foster curiosity. Can this be wood? Is it too heavy?
Anatomical correctness
This is not important but making the waist 60% to 65% of total height is a good rule of thumb. Cartoon animators and children’s illustrators frequently make heads oversize because they are cute.
Twigs, seeds and nuts
Drill holes then sand or whittle twigs to size. Disguise gaps around joints between twigs, seeds and nuts with epoxy putty, polyester resin, wood filler or sawdust and glue. Add splotches of paint and sprinkle grinder dust into it while it is wet to create a natural look. The color of most weathered wood can be matched using combinations of white, brown and black paint. I often dab a finger onto wet paint to spread and mix colors.
Color
Pieces can be enhanced with brightly colored cloth, highly figured wood, tints and abstract painting.
Fabric
Cloth may be attached with wood glue.
Inlays and additions
Felt, buttons, coins, bone, stones, shells and seeds can be inlaid. Inlays underneath a doll reward the inquisitive. Ensure that they cannot be removed.
Voids can be filled with tinted resin or wood fillers.
Consider adding symbolic items – mirror, key, watch, compass, spirit level, thermometer, weather vane, horn, cross, crown, sword, staff… Dentists often give away free 25mm diameter mirrors. A line level set containing three mini spirit levels costs only a couple of dollars.
A stone epoxied to a doll’s back could be a backpack, a baby or a burden.
A female doll could be a lidded box – two parts with a baby inside.
Lamination
Contrasting species can be laminated before turning or carving.
Dissection
A doll may be turned, halved and reconnected. One method is to start with square stock then turn 90% of the doll between centers leaving a square section attached at each end. Then divide with a bandsaw or circular saw [see third last photo] and hand finish.
Magnets
Mothers and babes can cling to each other. Wings, hats, cloaks and ball-bearing heads can be attached with rare earth magnets. A magnet inlaid underneath allows a doll to ride on a steel car or a wooden car with a magnet inlaid in the roof.
Drill holes and lock cylindrical magnets in the holes with metal-to-wood adhesives. Rare earth magnets that are 6mm in diameter and 6mm long have terrific holding power. Shorter magnets have enough holding power but it is harder to hold them securely. The magnets should be flush with the surface or just below [see second last image]. Align the two surfaces of mother and babe and mark where they touch to best position magnets. If the surfaces are curved then pretend that the curve was drawn with a compass and drill towards the center of the “circle”. This keeps the top of the magnet “parallel” with the surface.
NB Magnets must be glued in a recess rather than above the surface so they can’t be removed.
A professional furniture maker with a lifetime of experience reviewed these tips. He offered one comment with a sheepish look, “I made a mother and babe but I placed the magnets the wrong way and the mother rejected the babe. It’s tough to get the magnets out once you epoxy them in.” He hesitated then added, “I made a second pair and did the same thing.” He’s not alone. I did it too.
Wooden cars and trucks
Dolls can ride on cars with holes drilled in the top or with magnets. A truck that carries a driver and a load of bits and bobs is also entertaining.
Collaboration
The dolls pictured here are offered as a guide but therapists and teachers will be selective. They may have suggestions that will lead to improved designs. We can make better dolls if we collaborate with other woodworkers and craftspeople. Quilting clubs, sewing circles and pyrography groups might join with woodworkers to add fabric or otherwise embellish the dolls.
Have fun
Acknowledgements
Jill Gannon [she asked the key question that got me thinking], Gina and Anna Harrowell [fabric], Katy Gould [child play]. Mark Sfirri, Jean-Francois Escoulen and Mike Darlow [multi centre turning], Stephen Hogbin [dissection], George Hatfield [turning technique], Jaques Vesery [burning and coloring], Graeme Priddle and Brendon Venner [burning], Cynthia Garden [color], Betty Scarpino [texturing], Charlie Wheelhouse [magnets], Jean Wroblewski and Randall Sinnamon [additions], Helen King [resin], Terry Martin, Dee Ejiri and Yoshinobu Kakizawa [Kokeshi dolls], Joshua Friend [text].
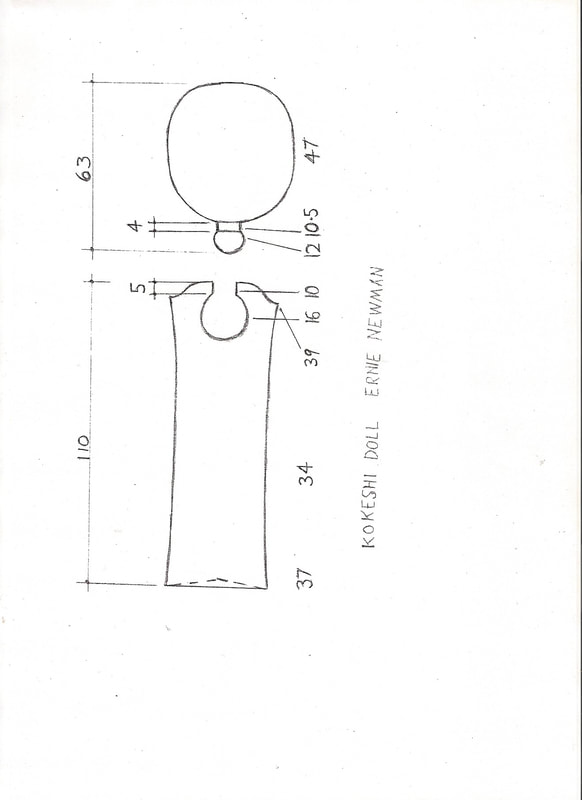
KOKESHI DOLL THAT 'CRIES'
Yoshinobu Kakizawa showed me how to turn a Naruko style doll that squeaks or ‘cries’. Thanks also to Terry Martin for background information.
Choose seasoned wood. Dogwood is used in Japan. Pinus Radiata and Australian native figs work well.
The knob can be on the body or the head but the following tips assume that the head is turned first. The parallel part of the neck is 4 mm long and 10.5 mm in diameter. See drawing below. The knob is roundish and 12 mm in diameter. Sand the head but not the neck. Leave the neck and knob unfinished as oil or other finishes may spoil the squeak. Part off.
Mount the body, turn and sand it but don’t undercut the foot so there is sufficient rigidity to hollow-turn the recess for the neck. The recess should be 10 mm in diameter at the opening and 12 mm or more inside. The entry to the recess is best drilled so it has parallel walls. It should be 5mm long. Use a bent hollowing tool to form the hollow inside the entry.
Because the neck is 1 mm shorter than the entry and the knob is 2 mm larger in diameter, there is a lot of friction when the head is forced inside the body with the lathe running. A speed of around 3000 rpm works well. Hold the head firmly and slowly force it into the body while the lathe is running. This takes about two to three seconds. Smoke should appear as the wood chars. Release the head instantly when the knob pops into the hollowed recess. At this point the head will be flush with the shoulders.
Stop the lathe and gently twist the head. If the doll doesn’t squeak then more friction may be needed. Hold the head and run the lathe for a few seconds then release. If too much friction is created then the head will be loose on the body and may fall out.
The doll “cries” - supposedly the cry of the departed child. They are made by about 100 turners in the village of Naruko [northern Honshu] named because it can mean “crying child” but the village was apparently named Naruko long before the turners arrived so the story may be apocryphal. Apparently kokeshi dolls from other areas of Japan don’t have the cry and rotating head.